Before you begin, make sure this integration will fit your company’s needs. We’d hate for you to jump into the setup process just to realize that the integration isn’t a great fit for your company today.
>> Read more about the integration and pricing here.
Adding and setting up the integration is self-service and can be completed at any time. As long as you are already a Paylocity customer and have your Paylocity Company ID handy, you’re ready to get started. Follow the steps below!
- Request integration access from Paylocity
- Confirm all data in Maxwell & Paylocity is accurate
- Establish the connection between Maxwell and Paylocity
- Configure your data sync settings
- Preview your data sync settings
- Activate and Sync
Step One: Request integration access from Paylocity
The integration requires Paylocity to grant Maxwell Health access to your Paylocity data. Paylocity will only grant your Maxwell account access after you submit a request.
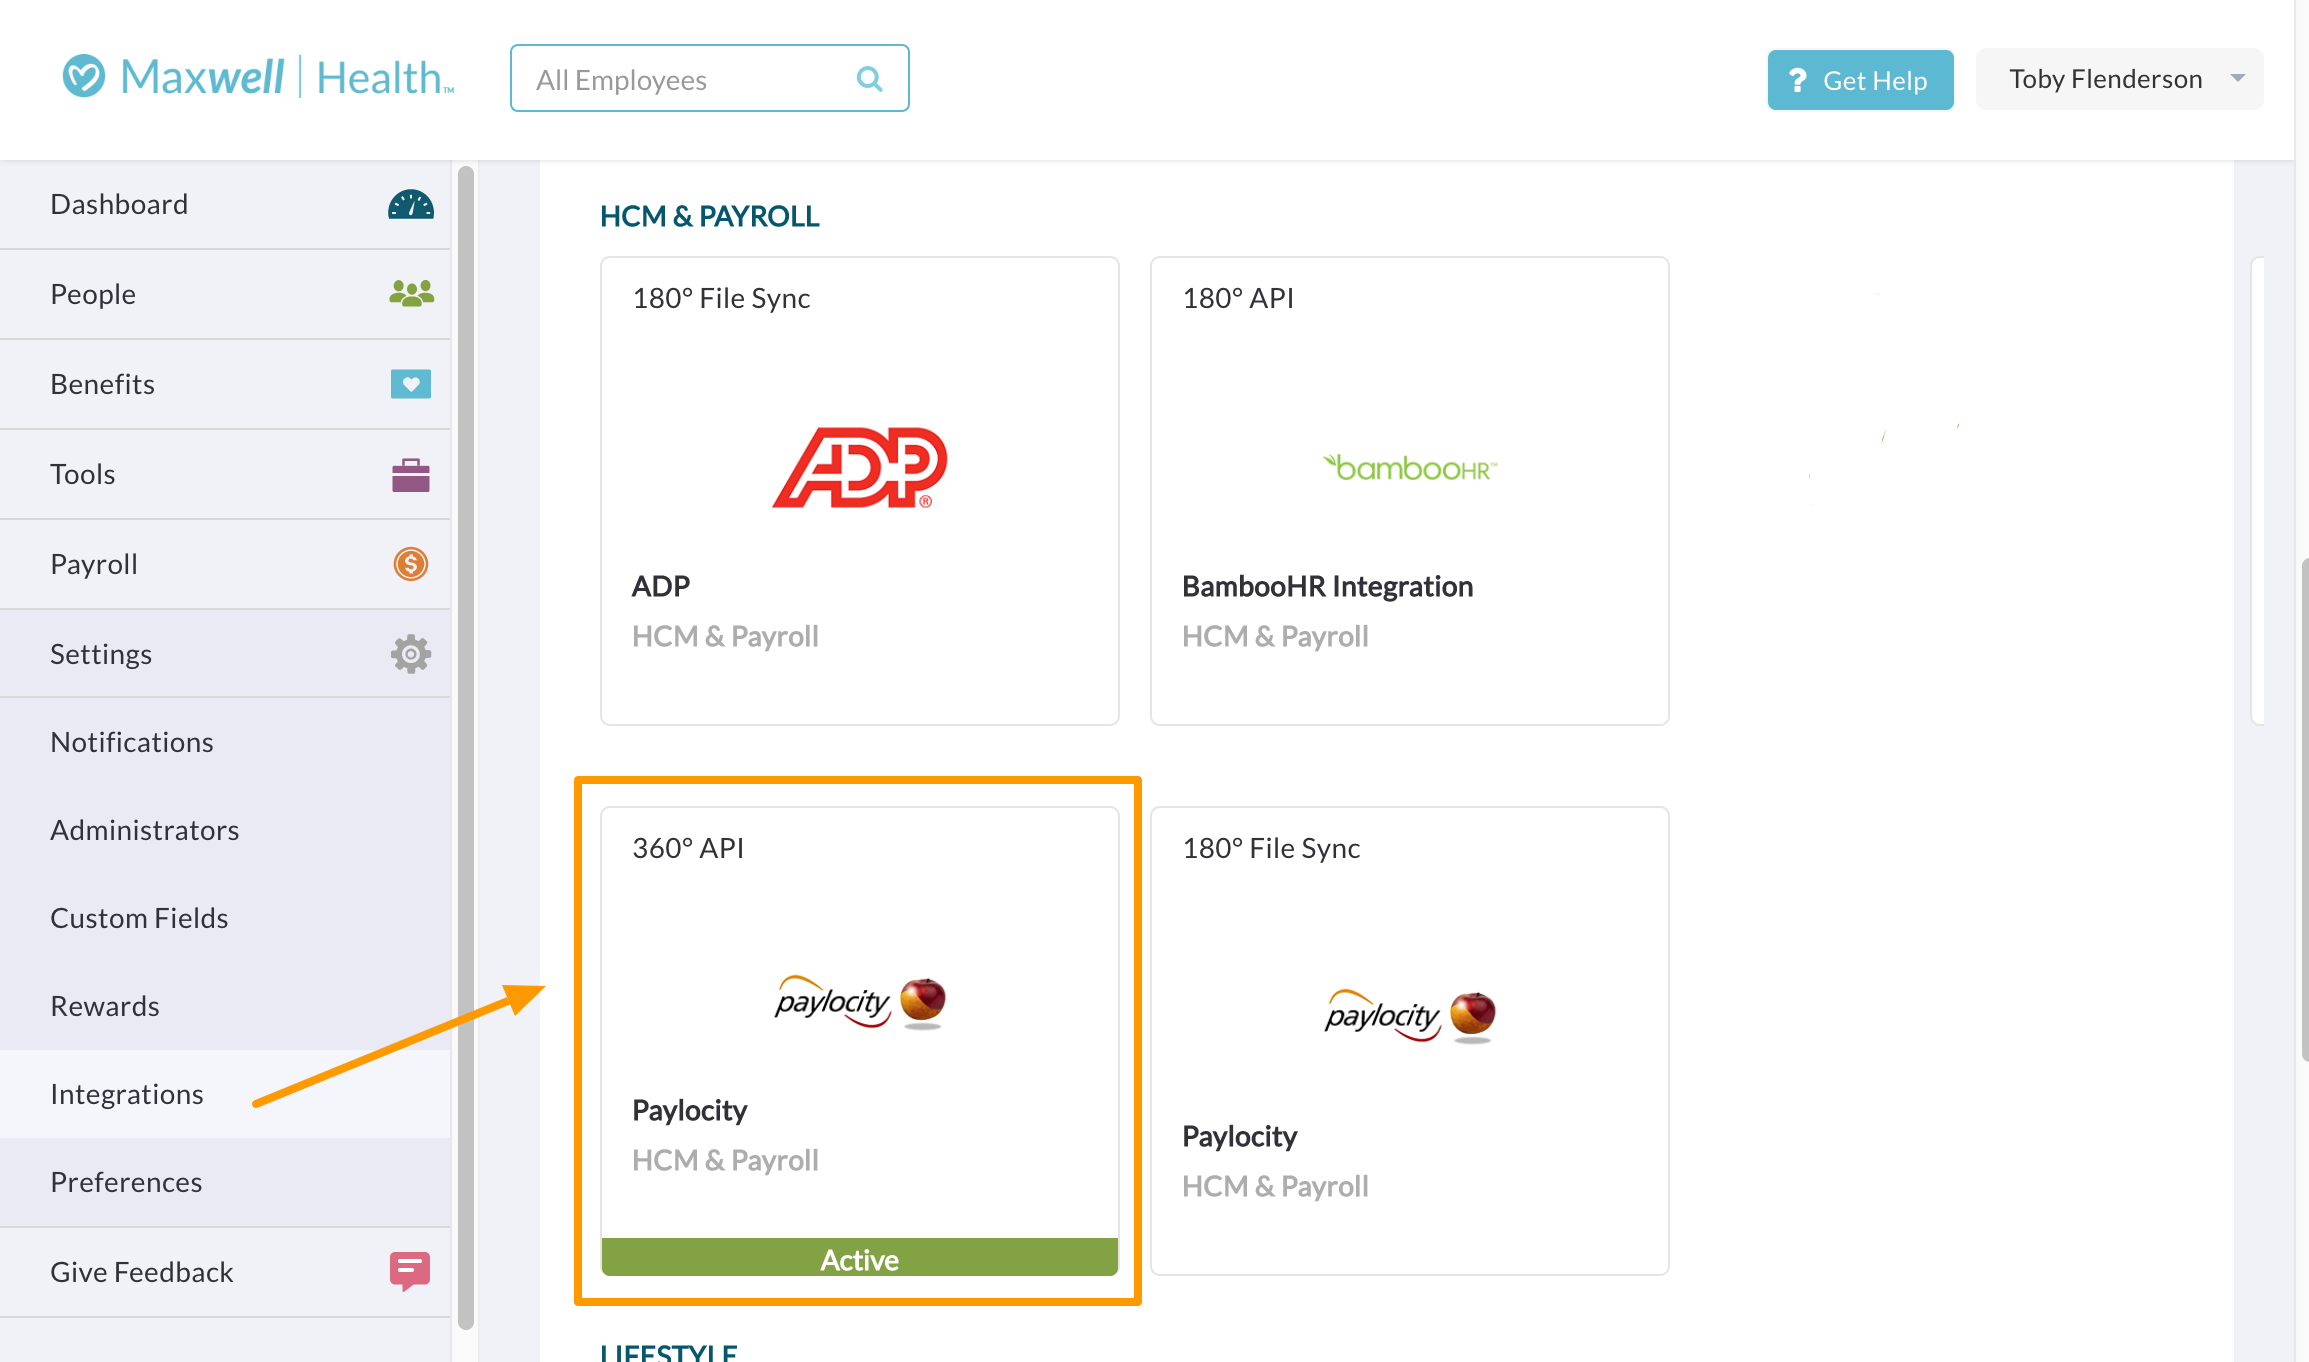
- Log into Maxwell and navigate to Settings > EDI and Integrations from the left-hand menu. Then select the Paylocity 360° API Integration.
- From the Getting Started checklist, you'll see the first step is to Get Paylocity Access.
- You can click the "Open Email" link if you would like to use an auto-generated, pre-populated email draft to begin the process.
- Send the pre-populated email draft provided by Maxwell or contact Paylocity support directly on your own to request integration access.
- Paylocity will then review your Paylocity account to ensure that you are ready to connect this integration. During the review process, which can vary in length depending on your configuration:
- Paylocity will review your earning and deduction code configurations in Paylocity.
- Paylocity will check field compatibility for the integration, including:
- Set up Benefit Class field in Paylocity to match Eligibility Group field in Maxwell
- Checking that employees have enough identifying information to be matched to Maxwell employees (see How Employees Are Matched).
- Paylocity will ensure sign-off from authorized administrators for this employer.
- Paylocity will then confirm and notify you by email that you are ready to connect Maxwell and Paylocity through this integration.
 |
Quick Tip: While you are waiting for confirmation from Paylocity, we recommend you begin to review your setup in Maxwell to ensure you’re ready to go when you receive confirmation (see Step Two below for more details). |
Step Two: Confirm all data in Maxwell & Paylocity is accurate
Before going any further, you should feel confident in the accuracy of data that you have in Maxwell and Paylocity. The integration will be most successful when you know you’re starting off with accurate information!
- Check your payroll calendar settings.
- If you haven’t already, you should check that the correct pay frequency is set for each eligibility group. This is important as the pay frequency is used to calculate employee contribution towards benefits with a monthly premium such as medical, dental, disability, and life insurance products.
- You should also add your payroll calendar into Maxwell. Entering your company’s pay dates is key to make sure Maxwell has the information needed to calculate accurate payroll deductions. Learn how to set up your pay calendar here >
- Review Employee ID field for your employees
- Before you sync information, you may want to review your employee data to make sure there is enough information to match employees across systems. Employees that exist in both portals will initially be matched based on Social Security Number (SSN). If SSN does not exist to match, First Name, Last Name, and Date of Birth will be used to match employees.
- When you activate the integration, the Paylocity employee ID field will be used to match your employees in Maxwell with your employees in Paylocity. The Paylocity employee ID field will display on Maxwell employee profiles once you successfully connect to Paylocity in the next step.
- Map your payroll codes in Maxwell.
- Confirm that all benefits that have costs you wish to sync to your Paylocity account have deduction and/or earning codes. Please read this article for everything you need to know about mapping payroll codes in Maxwell.
- Enable notifications.
- It is strongly recommended that you enable all Paylocity integration notifications in Maxwell so you can easily monitor changes that come from Paylocity into Maxwell and take action if necessary. You can review information on notifications for Paylocity here.
Step Three: Establish the connection between Maxwell and Paylocity
- Log into Maxwell and click Settings > EDI and Integrations > All Integrations on the navigation. Then select the Paylocity 360° API Integration.
- Confirm you have reviewed all the details to get started and click Next, Connect.
- Enter your Paylocity Company ID(s).
- If successful, your integration should now be connected and you can proceed.
- Please note: Access must be granted by Paylocity in order to successfully connect. If you are having issues connecting, please reach out to Paylocity and confirm that access has been granted.
- If successful, your integration should now be connected and you can proceed.

Step Four: Configure your data sync settings
This is where you’ll confirm which employees should sync and how you want to handle any existing differences in employee information to make sure everything is lined up between the two systems. Follow these steps:
- Set the system that will serve as the source of truth for employee demographic data upon the initial sync when you activate the integration. This is to resolve any existing discrepancies between employee records.
- Any employee demographic data that exists in the portal you set as the source of truth will sync over and replace information in the other portal.
- Example: If you select Paylocity as the source of truth, and an employee has a different address in Paylocity than what appears in Maxwell, the address information in Paylocity will sync and replace the information in Maxwell upon the initial activation of the integration.
- Please note: This setting only applies to the initial sync of information to resolve any existing differences in employee records. Once the integration is active, all demographic will immediately sync bi-directionally, so the records will automatically match.
- Determine if any employees should be excluded from syncing between Paylocity and Maxwell.
- Most employers will want to sync all employee records between Paylocity and Maxwell, but you can exclude employee records from syncing by setting filters based on employee information.
- Example: If you have a group of international employees who will not be offered benefits in Maxwell, you should set filters to exclude that group of employees.
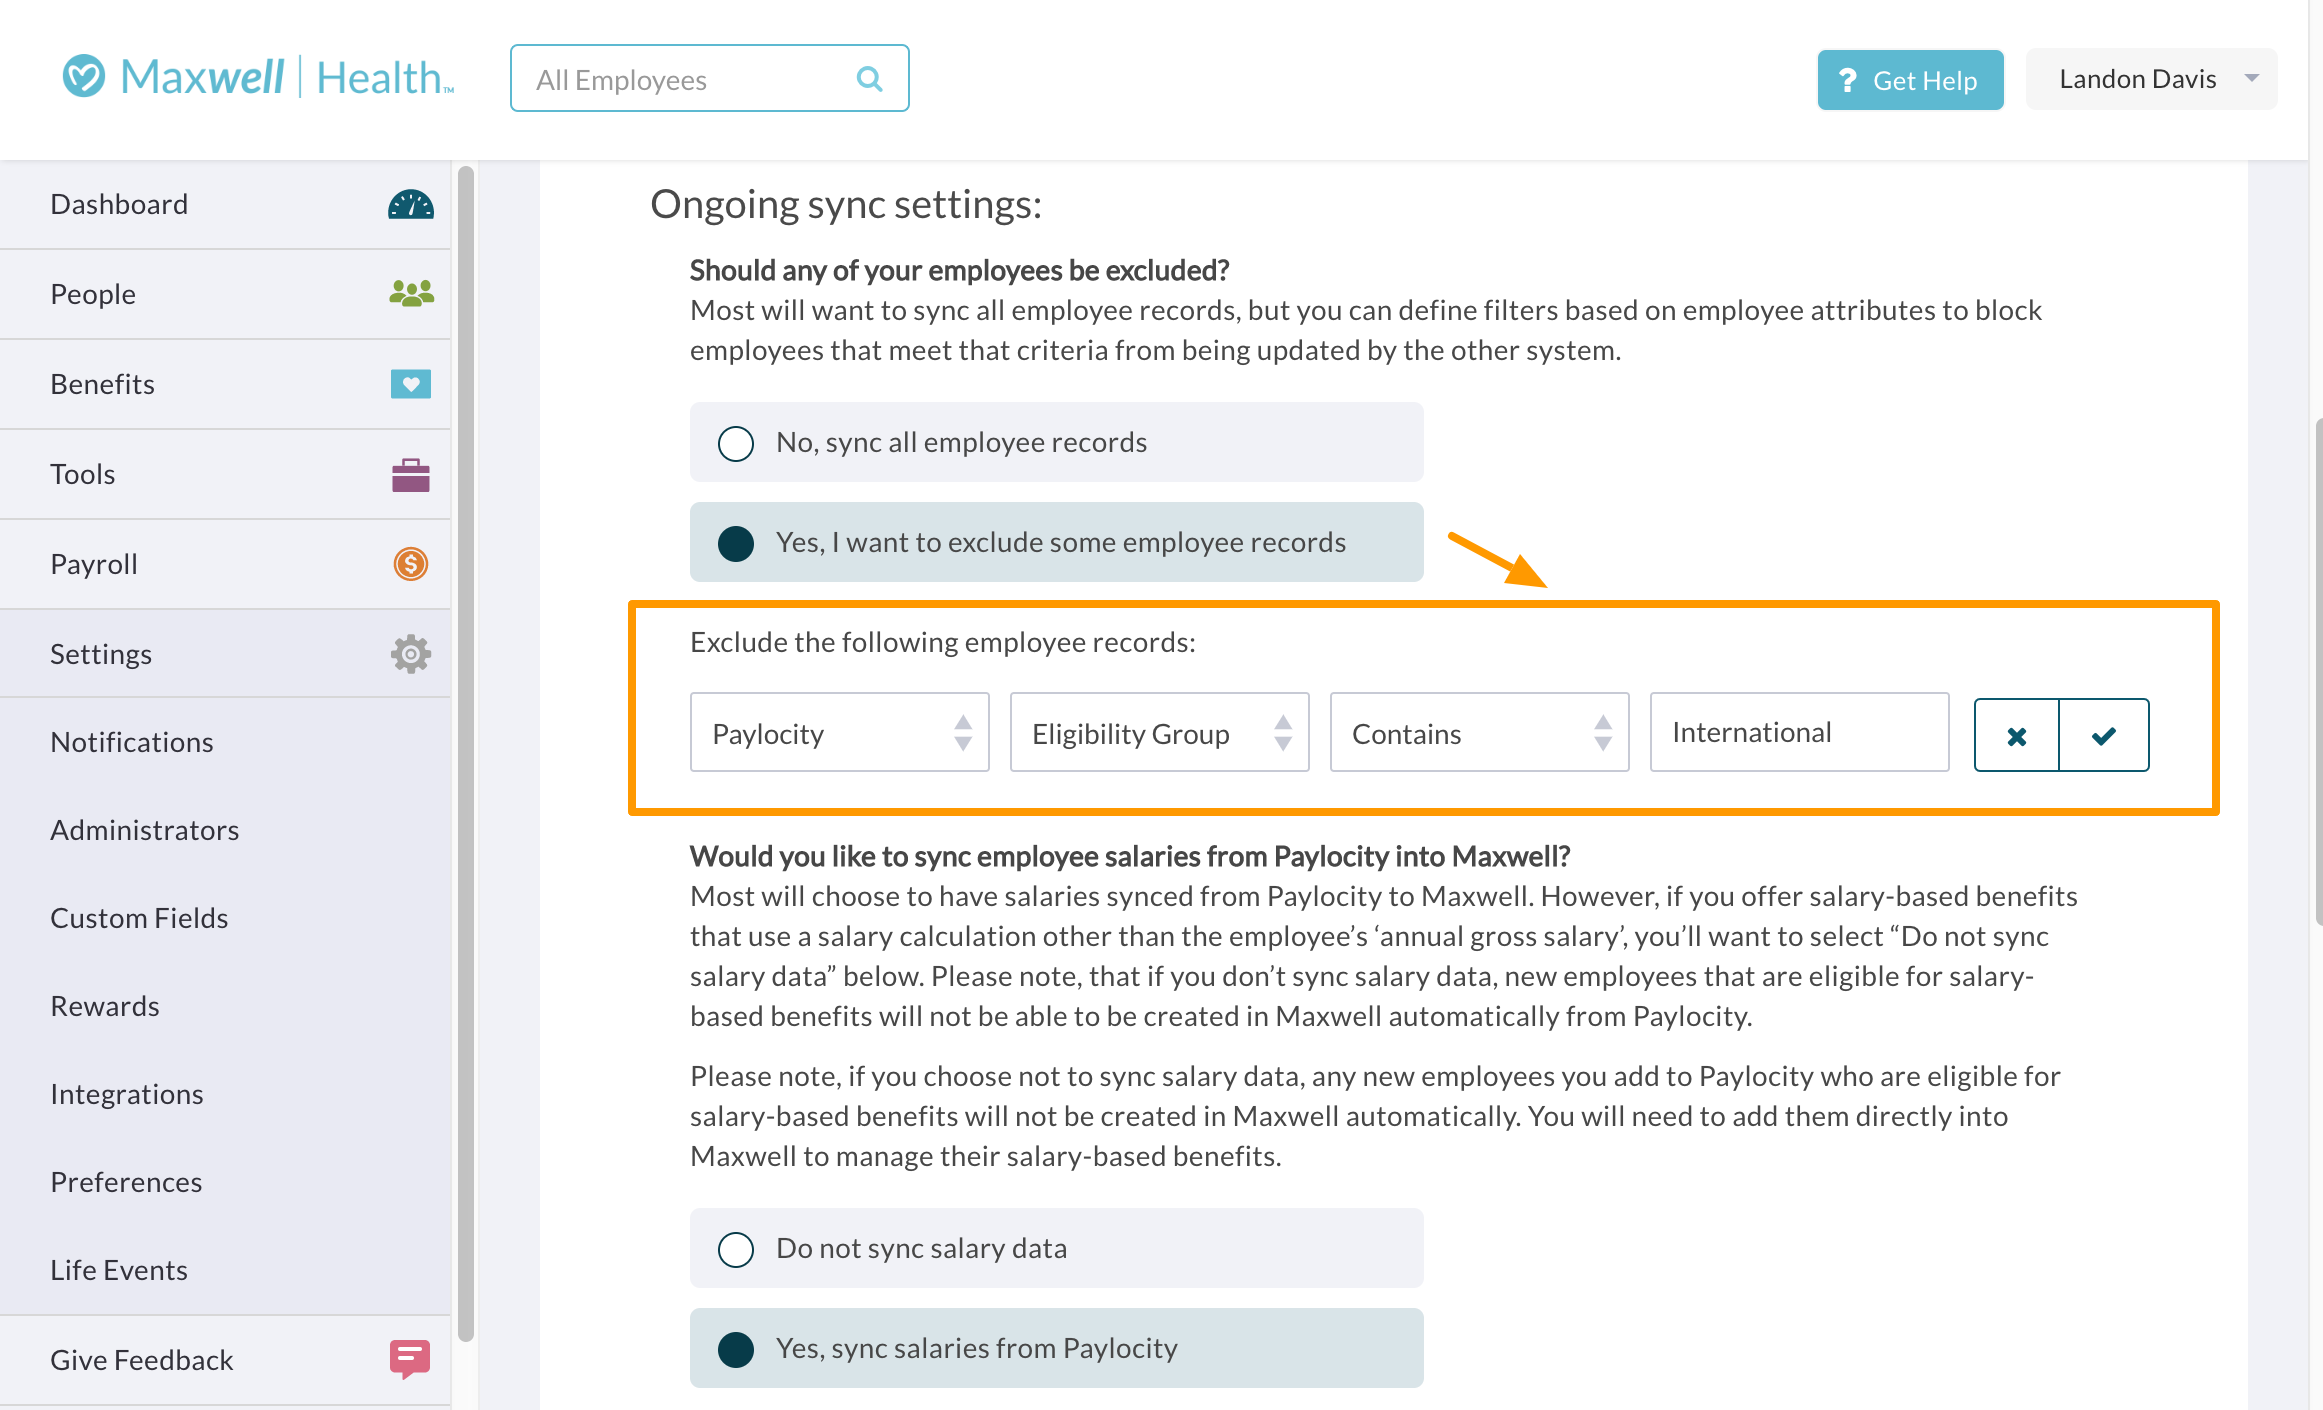
- Please note:This filter will continue to remain in effect as long as the integration is active. To change after activation, you will need to pause the integration.
- Select how you would like the integration to handle employee salary information.
- Most employers will choose to have salaries synced from Paylocity to Maxwell. However, if you offer salary-based benefits that use a salary calculation other than the employee's annual gross salary, you’ll want to select “Do not sync salary data” and manage salaries separately in Maxwell.
- Please note: If you choose not to sync salary data, any new employees added to Paylocity who are eligible for salary-based benefits will not be created in maxwell automatically (since they require a valid salary).
- You will need to add them directly to Maxwell to manage their salary-based benefits.
- Once added to Maxwell, demographic and benefit cost information will then be able to sync with Paylocity.
- Select the Paylocity email field that will be used for the employee's Maxwell email login
Step Five: Preview your data sync settings
Use the Generate Preview to review how information will update in Maxwell or Paylocity based on the sync settings you applied for the initial activation. This will give you an opportunity to confirm that your settings are correct before you activate the integration.
- Click Generate Preview.
- Select to download the Sync Preview Report excel file that is generated.
- Review the Sync Preview Report. (See below for tips on reviewing the report >)
- Resolve any discrepancies.
- As you review the report if there are differences in information between Paylocity and Maxwell that you would like to resolve before activating the integration, you should do that now and confirm those updates are completed by re-running the Sync Preview Report.
- Example: If your preview report includes a row where the summary is “Cannot Sync”, and it is due to missing information inside of Maxwell, then you should review the fields that require information and make that update in your Maxwell portal.
- When you have reviewed and approved your sync settings, click Review and Activate.
Tips for the Sync Preview Report
Here are a few tips on how to interpret results based on the summary for each employee row on the Sync Preview Report you will run prior to activating your integration. The report lists a row for each employee in Paylocity or Maxwell, along with how the current data exists in each system.
Results can include:
- Employee Filtered
- Employee will be excluded from the sync between Maxwell and Paylocity due to a filter you added in your sync settings.
- Cannot Sync
- Employee can’t sync due to invalid or missing data. The invalid fields will be listed in the details column of the preview report.
- Employee does not exist in the source of truth portal, but does appear in the other system. This employee cannot be synced, since that would mean deleting the employee and neither Maxwell nor Paylocity supports automatic deletion through the sync.
- Employee exists only in the source of truth portal, and cannot be added as a new employee in the other system.
- If Maxwell is the source of truth portal, and an employee only exists in Maxwell and not Paylocity, the employee cannot be added to Paylocity through the initial sync. You will need to add the employee into Paylocity first so information can sync between the systems.
- An employee cannot be added to Maxwell from Paylocity if they are eligible for salary-based benefits and you chose not to sync salary. You will need to add the employee into Maxwell first, and then other information can sync between the systems.
- Employee Create
- If the source of truth portal is Paylocity, and the employee does not currently exist in Maxwell, it will be created in Maxwell.
- Note: This could also be the result of an employee who was incorrectly set as “unmatched”. Double check that the employee is correctly matched between systems.
- Employee Terminate
- Employee in the source of truth portal has a terminated status but is not terminated in the other system. Upon activation of the integration, the employee will be updated with the termination date and reason in order to match across both systems.
- Employee Update
- Employee in the passive portal will have one or more fields updated. The updated fields will be listed in the Details column in addition to being highlighted.
- Deduction/Earning Change
- As a general rule, the deduction/earning amounts in Maxwell will replace amounts in Paylocity once you activate the integration. If you don’t want the Maxwell amount to replace the Paylocity amount, you should adjust your benefits in Maxwell (the system of record for benefit costs), or filter the employee(s). Please contact your Advisor to help you update benefits in Maxwell.
Step Six: Activate and Sync
Now, you’ll have one final opportunity to review your sync settings for the initial sync as well as your ongoing sync settings for employee’s benefit deductions and earnings.
- Review and Confirm:
- how demographic discrepancies should be handled for the initial sync
- if any employees will be excluded from the sync ongoing
- how salary data will sync ongoing
- When you’re ready, the final step to setting up your 360° API Paylocity Integration is to click Activate and Sync.
Note: The initial sync can take several minutes, especially if there are a lot of changes. However, you are free to navigate away or leave the app and come back while the initial sync is running.
Congratulations on activating the Paylocity API integration! Going forward, any matched employees (based on your ongoing sync settings) will be synced between Maxwell and Paylocity.
Support
If you have a question about the API Integration functionality, setup, billing, or your sync, please contact Maxwell Customer Support at support@maxwellhealth.com. You can also learn more about how the integration works in this article.
If you have a question about Paylocity functionality or product offering, contact your Paylocity representative or visit their site.